
Joey Lopez is proof positive of what can happen when you put your inspiration into action. While working in IT, he started infusing his graphic design hobby into his day job – with stellar results: GeekSquad used his department redesign in every Best Buy nationwide. This positive reception led Joey to earn a degree in graphic design, and now he’s advanced his career yet again to product design, making award-winning toys for kids around the world. A key component of Joey’s creative process? KeyShot! Read on to learn how Joey used KeyShot to leap from 2D to 3D design.

Joey Lopez
Website | Instagram| Linkedin
Modeling software used: Rhinoceros, Sketchup, Boxshot Origami
When did you start working with KeyShot?
My first exposure to KeyShot was at Jacuzzi Luxury Bath, which used KeyShot for still renderings of bathrooms and spas. A coworker showed me the ropes and how KeyShot’s Real-Time View continuously renders your changes to show you how your render will look in near real-time, and this really intrigued me. Inserting a 3D model of a bathtub and matching the angles of an existing photo was where I started with KeyShot. It became a fun new challenge to tweak the scene to require as little Photoshop post-processing as possible! I wanted that scene to be so perfect that if anyone wanted a different angle or lighting or detail featured, it would only take a small tweak and a quick render to get output-ready work. KeyShot made that possible.
What are some things you’re especially proud of working on?
There are so many. BrainBolt was the first product I used KeyShot to develop. BrainBolt is an electronic puzzle toy like Simon, but even more addictive and challenging. Its inventor, Richard Levy (who co-created the Furby, among other famous toys) hadn’t liked designs put forth by other industrial artists, and the product development manager liked my work, so I was asked to take a crack at it. KeyShot was integral to creating the BrainBolt prototype and packaging. Selecting the colors, materials and finishes (CMF), along with setting up multiple options with multi-materials and studios in KeyShot, allowed quick iteration and exploration of the industrial design. I developed the packaging with KeyShot, along with a companion app for Adobe Illustrator called Boxshot Origami. Origami operates as a plugin for Illustrator by generating dielines from dimensions and then putting vector dielines on a layer in Illustrator – and converting them into a folded-up 3D model that we then exported to KeyShot for final render. Origami is similar to ESKO, but much lower-priced and more accessible for graphic designers not as familiar with CAD. (If you’re interested, I created a tutorial for designers to take their packaging from Origami to KeyShot.)
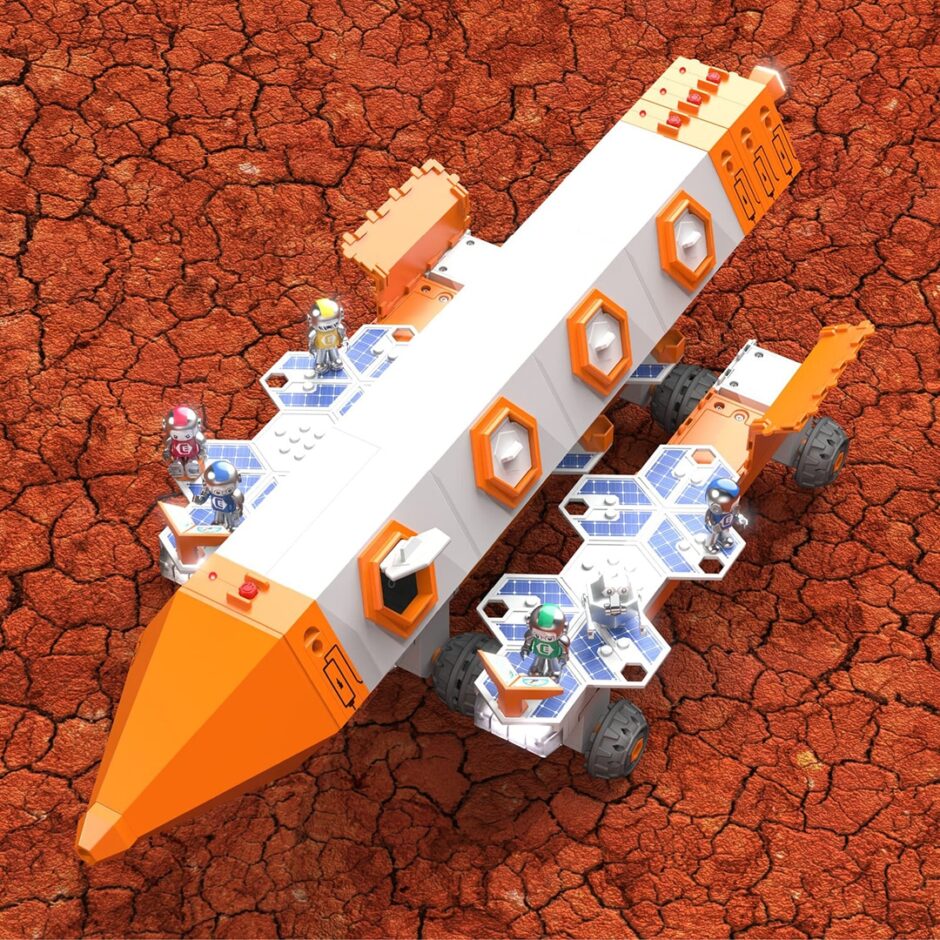
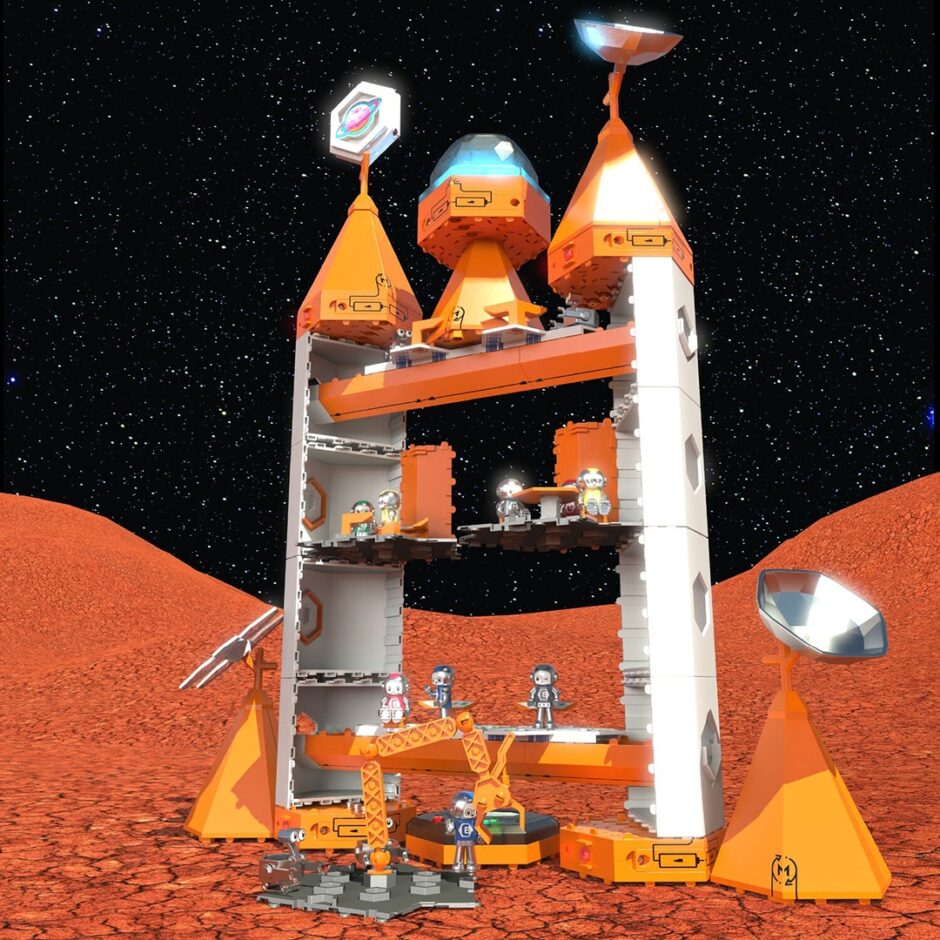
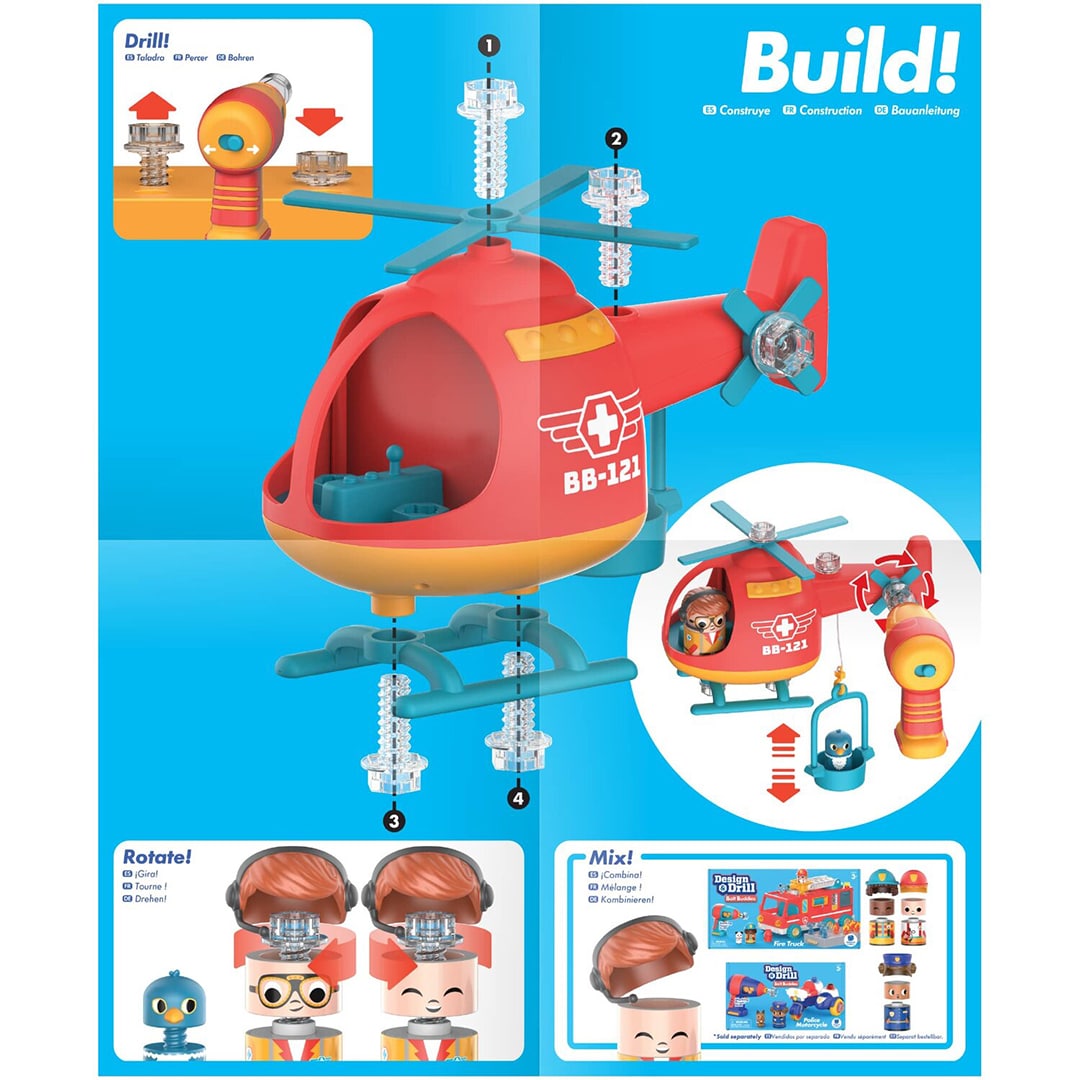
I’m also proud of the Circuit Explorer toys. These space-themed sets of building block toys do more than just create vehicles and buildings, they teach kids the basics of electronics and electricity in lights, motors, sounds and structures. For these toys, KeyShot became a QC tool for us, allowing us to build the sets and find places where a piece could be changed to allow for more fun experiences. We found several parts while “playing” in KeyShot that we changed to work more universally with other pieces in the sets. These playsets have a special set of instruction books, and every single step of these guide books has a KeyShot render illustrating what to do.
Whether it’s for a black and white technical drawing using KeyShot’s ‘toon’ shaders, or a more realistic drawing with proper lighting, bump maps, and translucencies, knowing KeyShot means that product photography is no longer required for fast turnarounds.”
How can traditional designers make the leap to animation?
This is becoming more common as designers are being asked to source or create images when none exist. For example, when creating an instruction guide for a toy, the graphic designer might create an illustration from photos, the CAD renders or technical drawings. This is time-consuming, and it’s hard to make an accurate illustration, especially if the product design is in flux. But having access to the CAD file for a hardline consumer product means we can open it up in KeyShot and make it real. Whether it’s for a black and white technical drawing using KeyShot’s “toon” shaders, or a more realistic drawing with proper lighting, bump maps, and translucencies, knowing KeyShot means that product photography is no longer required for fast turnarounds.
Instead of having to wait for the final product to be finished, the designer can create photo-realistic images of the product for the package fronts, marketing materials and Amazon thumbnails. Once the CMF specs are set, the product is ready to be animated. For many of us, making the jump from static renders to animation videos just requires watching a couple of YouTube training videos. Ever since KeyShot added keyframes to animation, the work has become exponentially more streamlined, meaning we can work in KeyShot similarly to how we’d work in any non-linear video editing app. A good example is the exploded animation view for my Toy of the Year nominated Artie 3000. Someone learning KeyShot animation for the first time today would only need to know that they can move their model or camera to where they want it, create a keyframe, and begin showcasing their vision.
“Thank you so much for creating this amazing product that has brought so many designers to participate in the 3D world.”
